Blogs
|
Well, I ordered the iPad 2 at 4am yesterday morning, but it was not going to arrive for more than a week, so I just went to my local Best Buy and was able to get the same model I had ordered in my hand today! (Online inventory reporting is a great thing!) Got the white, 64gb, WiFi & 3G, AT&T version.
With a simple call to AT&T, I was able to transfer my unlimited data plan to the new iPad 2 without a problem. (Hint for anyone else who is planning to do that-- sync the new iPad to your iTunes account and transfer all the stuff from your old iPad over before you call, so you do not have to stay on the phone for 30 minutes with AT&T. They were very helpful, but wanted to make sure the transfer of the account worked, so I had a lovely conversation with the agent about any number of things as all of my data and 253 iOS apps and 700 songs moved to the new device!)
Reasons I purchased the new iPad 2
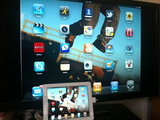
Craved the mirroring of the screen via the VGA dongle which makes training and showcasing apps oh-so-nice! I know, I could have jailbroken the old one, but did not want to go that route.
The two cameras, one for Facetime and one for photos and video so I can now use all my cool iOS photography apps on the iPad. I can also take movies and dump them right into iMovie or ReelDirector on the iPad 2.
Reportedly (and oh-so-true!) faster app launches
I so wanted a white iPad. I was tired of the black-on-black color scheme.
Mirroring of the iPad 2 onto my TV
Things I did not really care about but which are very nice
The new one is thinner than the original but very sturdy
It is lighter, too, but it does not really seem that it is 15% lighter.
The new cover, which I was not going to get, but did. Besides keeping the screen very clean, the ability to type on the slant and, more importantly, hold the folded back cover in your hand as you use the iPad, is a big plus. Plus the magnetic way it attaches and turns the device on and off is very neat!
If you have any questions or want me to try some things out, please let me know!
Visit Kathy's Web pages:
Kathy Schrock's Home Page
Kathy Schrock's Guide for Educators
Kathy Schrock
.
Blog
.
<span class='date ' tip=''><i class='icon-time'></i> Aug 05, 2015 06:19am</span>
|
|
Facts.
Leslie Owen Wilson provides a good overview of Anderson and Krathwol revised Bloom's Taxonomy which was updated in 2000.
Andrew Churches developed a model, called Bloom's Digital Taxonomy, to highlight the use of tools and technologies at each level to facilitate learning.
Alex Ambrose (2009) created a site dedicated to his idea of Googlios, the use of Google tools to support the creation of student ePortfolios to enhance their personal learning environment.
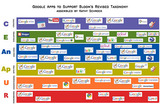
After looking through the wealth of information offered by Andrew and Alex, and having already developed my own version of Bloom's Digital Taxonomy with my favorite Web 2.0 tools for students to use at each cognitive level, I decided to combine the two-- a Bloom's Digital Taxonomy using ONLY the suite of tools offered by Google.
Boy, was I surprised! Even as a Google Certified Teacher, there were so many cool new tools that I did not know about! Google has purchased some already created, and there are some neat ones in Google Labs, which, hopefully, will "graduate" soon and become part of the core group of Google Tools.
I explored 51 Google tools as I figured out how they met Andrew's criteria for each level of the Bloom's Digital Taxonomy. I justified their use, and some appear in all levels, some in various, and some only in a single level. In my presentation about "Connecting Your Classroom to the Future", I am redoing the section which highlights Web 2.0 tools and highlighting instead the "less-mainstream" Google tools.
I developed a clickable graphic to allow educators to make their own judgments on how the tools can be used to support student learning at each level. I know you creative educators will come up with great ideas to for their use. (Hum, I think I will add a Google form to that page to allow educators to contribute their ideas, too!) The screenshot of the very busy graphic is below, and you can find the information and clickable graphic at this URL: http://kathyschrock.net/googleblooms/
http://kathyschrock.net/googleblooms/
Let me know via email or comments or Twitter what you think of it!
Visit Kathy's Web pages:
Kathy Schrock's Home Page
Kathy Schrock's Guide for Educators
Kathy Schrock
.
Blog
.
<span class='date ' tip=''><i class='icon-time'></i> Aug 05, 2015 06:19am</span>
|
|
There has been much positive feedback to my Bloomin' Google page (http://kathyschrock.net/googleblooms/) Thanks to all who sent me notes!
But, through my Google Alerts, I have seen that others are questioning the use of the tool and where I placed things and the limiting of the creativity of teachers. (Geesh!) There were various reasons for its development and why I put things where I put them.
Finding and utilizing ALL of the Google Tools gave me a good 100 hours of experience across the board. I was able to eliminate the tools that are just information sources and focus on the rest.
Being an a avid follower and studier of Andrew Churches work with the Revised Bloom's Digital Taxonomy for the past year, I feel I really understand how it works. I had created, with his permission, my own version of the triangle using mainstream Web 2.0 tools and utilities, and had been showcasing that in various presentations.
As a Google Certified Teacher, I wanted to see if Google even HAD the tools to target each level of the taxonomy. I made the decision as to what level I assigned them to based on my years of experience with teachers and students and curriculum and assessment.
Another of my goals was to introduce teachers to the "less common" tools in hopes they would explore them. I, too, found out so many cool things about the tools while working on this project. I have since adapted my presentation about the Digital Taxonomy to showcase the lesser-known Google tools that can be used at various levels.
I stand by my choices, and could have included the rationale for why I put things on the various levels. It truly was hard to do, and I put a lot of thought into it. However, I felt it was better if I stepped back and allowed the creative teacher minds to contribute to the spreadsheet of ideas both with their successful practices and ideas sparked by "Bloomin' Google".
In addition, there has been some chatter as to the Creative Commons license type I assigned to the information I created. I don't want alternate versions out there that are attributed to me. This one is mine, and you can use it, but think about ways you can develop your own.
For instance, if you are a content area teacher, create a Digital Taxonomy using the online tools and sites relative to that content area. (You are the creative content expert, not me!) Provide the justification for what you picked or provide a form for others in your content area to add to the information you present.
I hope this provides information in addition to the 140 character tweet that announced the project and the previous blog post!
Kathy
Visit Kathy's Web pages:
Kathy Schrock's Home Page
Kathy Schrock's Guide for Educators
Kathy Schrock
.
Blog
.
<span class='date ' tip=''><i class='icon-time'></i> Aug 05, 2015 06:18am</span>
|
|
Thank you to all the educators who participated by populating the spreadsheet with almost 200 interactive tools that would take advantage of the touchscreen on the Lenovo ThinkCentre M90z. The spreadsheet is located here if you are interested in viewing the list of the tools!
As the rules stated, if there were any duplications of tools submitted, the later submission was deleted from the spreadsheet before I picked the winner. (There were five duplicate sites submitted.)
I used the Random Name Generator suggested by Richard Byrne, to pick the winner. It is a great little tool and one you should put in your classroom technology toolbox!
The winner of the Lenovo M90z is Megan Black!
Screenshot of the result from the Random Name Generator
Congratulations to her, and thank you again to everyone who participated! And thanks also to Lenovo and Ivy Worldwide for running this contest!
If you wanted some other chances to win a ThinkCenter M90z, take a look at the list below for additional giveaway contests!
Lenovo M90z Giveaway Participants
Site Start End Date
Free Tech 4 Teachers Apr 14 Apr 18
Ilja Coolen \ ICSS Apr 15 Apr 19
Physician Mom Apr 16 Apr 20
Scrubd In Apr 17 Apr 21
Kathy Schrock's Kaffeeklatsch Apr 18 Apr 22
Steve Hargadon.com
Apr 19 Apr 23
Box of Tricks Apr 21 Apr 25
Clinton Fitch.com Apr 22 Apr 26
Around the Corner Apr 23 Apr 27
Tech Savvy Ed Apr 25 Apr 29
Small Biz Technology Apr 26 Apr 30
Ablet Factory Apr 27 May 1
Click Newz Apr 28 May 2
Geekazine Apr 29 May 3
21st Century Education Technology Apr 30 May 4
A GeekyMomma's Blog May 1 May 5
Marsha Collier's Musings May 2 May 6
VA Networking May 3 May 7
Your Virtual Assistant May 4 May 8
Jake Ludington's Media Blab May 5 May 9
Mobile PC World May 6 May 10
Dangerously Irrelevant May 7 May 11
Bud the Teacher May 8 May 12
Kikolani May 9 May 13
Geeks To Go May 10 May 14
Chad Lehman.com May 11 May 15
Visit Kathy's Web pages:
Kathy Schrock's Home Page
Kathy Schrock's Guide for Educators
Kathy Schrock
.
Blog
.
<span class='date ' tip=''><i class='icon-time'></i> Aug 05, 2015 06:18am</span>
|
|
I have moved myself from PowerPoint to Keynote on the Mac in the last year for creation of my presentations. For those of you that do not use Keynote, there is one major difference between Keynote and PowerPoint.
When I create PowerPoint presentations with linked videos or audios, I had to make sure to bring the media files along with my presentation when I went out to speak. Keynote, on the other hand, embeds all the media files right within the Keynote file itself, so I only have to take one (large) file with me! This is a huge relief for those of us that were always worrried that we might forget one of the linked videos for our PowerPoint presentations!
When Keynote for the iPad came out, I was very excited since it was very easy to move my Keynote files from my computer through iTunes, iWork, or my iDisk to Keynote on the iPad. All the sound files, movies and the standard transitions and timings worked great on the iPad. And, once the latest version of Keynote for the iPad came out, and I could see my presenter notes on the iPad while presenting, I began to present directly from the iPad with the VGA-out connector!
The one thing I had not done was create a Keynote presentation on the iPad itself. I purchased the Visual Quickstart Guide, Keynote for the iPad, by Tom Negrino and found that it is really well-written. As one that learns well from manuals, I read it through it and tried some things out.
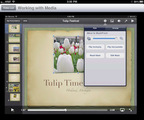
However, an iPad app, Tutor for Keynote for iPad by Noteboom Productions, was recommended by my friend Midge Frazel, and I decided to demo it. It is made up of a series of screencast tutorial videos and is chunked beautifully! The speaker's voice is calm and low-key, and the tutorials are very easy to follow.
Screenshot from Tutor for Keynote for the iPad
The screencasts are broken up into the follow chapters:
Introduction
Presentation Sample
Presentation Sample Close Up
Keynote Interface
Virtual Keyboard
Themes
Working with Slides
Skipping Slides
Working with Objects
Deleting Slides and Objects
Working with Text
Working with Media
Working with Tables
Working with Charts
Working with Shapes
Hyperlinks
Copy and Paste
Transitions
Magic Move Transition
Using Builds
Presentation Notes
Laser Pointer
Sharing
Conclusion
After watching the entire series of tutorials and experimenting with Keynote on my iPad after each chapter, I realized that Keynote on the iPad is full-featured enough for teachers and students to utilize it for creating their presentations. You really do not need to have access to a presentation program on a desktop if you have an iPad. With the purchase of the Keynote for the iPad application for $9.99 and this Tutor for Keynote for iPad app for $3.99, you and your students can have both a wonderful tutorial series and the software you need to create stunning presentations with enough bells and whistles to keep any student engaged!
Visit Kathy's Web pages:
Kathy Schrock's Home Page
Kathy Schrock's Guide for Educators
Kathy Schrock
.
Blog
.
<span class='date ' tip=''><i class='icon-time'></i> Aug 05, 2015 06:18am</span>
|
|
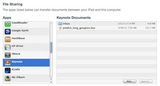
Okay, I was determined to use the iPad to present yesterday, so I had created the presentation on the desktop in Keynote and moved it to the iPad through the file sharing in iTunes. I just dragged it to the area next to the Keynote app and it moved over to the iPad the next time I synced. You can see this below. (Fig. 1)
Fig. 1 Moving a Keynote file from the computer to the iPad via iTunes
The presentation worked perfectly when I tested it via the VGA connection. All embedded movies worked, and things looked great! However, before I presented, I found another great video to use in the presentation. I only had the iPad, and did not know how to get the video into the PHOTOS app on the iPad, which is the only place Keynote on the iPad would pull it from. I tried iWork, DropBox, iDisk, and emailing the file to myself. I could play it on the iPad, but not insert it into the presentation.
It seems as if the only way you can get a video into the PHOTOS app is by using the computer you regularly sync with. I first tried loading the video into iTunes, and syncing, but that put the video in the VIDEOS app on the iPad which Keynote cannot import from.
So, here is my solution.
Fig. 2 Folder on computer containing images and videos
Go into the Pictures folder on your computer.
Create a folder (mine is called "_pics for iphone") (Fig. 2)
Put the photos AND videos you want to use with Keynote on the iPad into this folder
Go into iTunes, pick your iPad, and choose the PHOTOS tab.
Chose to "sync photos from pictures" (instead of iPhoto). (Fig. 3)
Pick "selected folders"
Check "include videos"
Check the folder you created which contains your assets.
Fig. 3 Setup in iTunes for syncing a particular folder of images and videos to the iPad
The items now all wind up in the PHOTOS app, as you can see from the screenshot below. (Fig. 4)
Fig. 4 Photos and the video in the iPad Photos app
Once you open Keynote on the iPad, add a new slide, and chose the MEDIA tab, you can easily chose the video from the PHOTOS app to embed into the presentation. (Fig. 5)
Fig. 5 Selecting the video file from the Photos app in Keynote on the iPad
And, finally, the video is embedded in the Keynote presentation on the iPad. (Fig. 6)
Fig. 6 Media embedded in the Keynote presentation on the iPad
You will need to know this process if you are planning to add media to a presentation you create on the iPad or add media to one that you have moved from the desktop to the iPad. I hope this blog post helped you out! (And, by the way, giving the presentation from the iPad yesterday was a breeze!)
Addendum (5/8/11)
When creating a Jing screencast sometimes, even after embedding it on Keynote for the Mac and moving the file to the iPad, the video is not accepted. I have found that the best format for videos to put in Keynote presentations on the Mac to make sure they work on the iPad, are mp4s with the codecs of H.264 and AAC.
I also found out that embedded audio files in a Keynote for the Mac presentation don't move over to the iPad. I had to make little movies of static images and put the sound files as the audio line in the mp4 in order to play the sounds in Keynote on the iPad.
Addendum (5/13/11)
Mike Wakefield sent a comment...."Kathy - I had no problems with a video (h.264) I e-mailed myself on the iPad2; when I touched the reply/fwd arrow in the (iPad) e-mail app, I just hit the "save video" option and it popped it right into my Photos file on the iPad. From there, I was able to bring it into Keynote with no issue." I tried it and it worked like a charm...thanks, Mike!
@WebGalPat on Twitter tried a "regular" mp4, and it worked just fine, too! Thanks, Pat!
Visit Kathy's Web pages:
Kathy Schrock's Home Page
Kathy Schrock's Guide for Educators
Kathy Schrock
.
Blog
.
<span class='date ' tip=''><i class='icon-time'></i> Aug 05, 2015 06:18am</span>
|
|
I have four more work days and then 3 professional days for ISTE11 left in my Massachusetts teaching career. I recently had a taste of my "new" life when visiting Buffalo Public Schools the week before last and Fort Bend (TX) ISD this past week. It is a lot of fun to speak to teachers and learn about their district tech priorities. I think I probably learn more from them then they learn from me!
My plans for retirement are heating up! I am excited to have contracts with McGraw-Hill and Follett in the area of edtech professional development. I will still be teaching my Wilkes/Discovery Master's classes, working on my Discovery page (Kathy Schrock's Guide for Educators) and I have six presentation gigs lined up between now and December!
Spotlight Speaker
Infographics in the Classroom as a Creative Assessment
June 27, 2011; 2:30-3:30 pm in PACC Grand Ballroom B
Poster Session
Using the Manufacturing Process Across the Curriculum to Target Literacies
June 29, 2011; 8:00 -10:00 am in Poster Session Area (Broad St. Atrium #30)
ISTE Annual Conference, Philadelphia, PA
June 26-29, 2011
Presenter
Infographics in the Classroom as a Creative Assessment
Twitter for Administrators
Connecting Your Classroom to the Future
South Berkshire Educational Collaborative, South Barrington, MA
July 11 and 12, 2011
Keynote and Workshop Presenter
Rhinebeck Central School District Superintendent's Conference Day
October 7, 2011
Featured Presenter
4 presentations TBD
GATEC Conference, GWCC, Atlanta, GA
November 3, 2011; Time (tentative): 3:00-4:00 pm and 4:15-5:15 pm
November 4, 2011; Time (tentative): 8:30-9:30 am and 9:45-10:45 am
Featured Presenter
Infographics in the Classroom as a Creative Assessment
Connecting Your Classroom to the Future
Christa McAuliffe Technology Conference, Manchester, NH
December 1, 2011; 10:00am-11:00am and 1:00pm-2:00pm
Keynote
Infographics in the Classroom as a Creative Assessment
R.I.P: Respect for Intellectual Property
Mid South Technology Conference, Memphis, TN
December 8 & 9, 2011
I have a couple of other irons in the fire, too, but news of those will have to wait.
People ask me if I feel nostalgic about retiring from my district. I don't. I see it as an exciting new chapter in my life with the opportunity to grow my knowledge and expertise!
The times they are a changin'....
Visit Kathy's Web pages:
Kathy Schrock's Home Page
Kathy Schrock's Guide for Educators
Kathy Schrock
.
Blog
.
<span class='date ' tip=''><i class='icon-time'></i> Aug 05, 2015 06:18am</span>
|
|
http://www.flickr.com/photos/
klm_digital_snaps/5910285716/
It has been almost a month since I left the office for the last time and, although I do not think I look as relaxed as those retirees that come back to visit the school, I am getting there!
The ISTE11 Conference was first on the retirement "to-do" list. This year's conference in Philadelphia was just buzzing with positive energy! The sessions were varied and well-done, and the entire event was one of the best ISTE Conferences I have attended. My infographics presentation was well-received and the poster session I co-presented with Kim Conner, my district's middle school ITS, dealing with our "Manufacturing Across the Curriculum" Verizon Foundation grant was fun to do, too!
From there it was on to Hershey, PA to visit a high school friend and then home to get ready to travel to the Berkshires in western Massachusetts to present at the Southern Berkshire Educational Collaborative where I presented to a great group of principals and educators. David Warlick and I tag-teamed throughout the two days, and we seem to complement each other-- his down-home, southern charm is in direct contrast to my rapid-fire New Jersey style, but it seemed to work well!
In between, I have had time to try out all the new tech things that have been introduced. Google+ was released and I had the luxury of time to try to wrap my head around it and to attend and host lots of hangouts with friends and edtech colleagues. It takes some getting used to, but there are plenty of instructional videos available to help you out. And, there was the new Skype-in-Facebook to try out, too-- a one-to-one video conferencing option built into Facebook. It is smooth and easy to use!
I have signed agreements with McGraw-Hill, Follett, and eGenio, all to provide some form or another of professional development over the next year or so. (Watch for announcements of all kinds of Webinars if you are interested!) I continue, of course, to take care of my Discovery Education site, Kathy Schrock's Guide for Educators and will continue with that as long as they will have me!
If you are interested in learning more about the use of infographics as a classroom assessment tool, I am teaching a 9-week, online graduate course this fall through our state ISTE affiliate, MassCUE. And, I continue to teach the Web 2.0 course in the Wilkes/Discovery Education Instructional Media program. You do not have to be in the program to take a course, and the courses are all practical and would support any level and any curriculum.
In addition, since I now have the time, I will be presenting at lots of places during the school year. The list thus far looks like this. It is exciting to be able to have the chance to provide professional development to educators around the country!
People tell me I will miss "school" once September comes. However, as I think about my previous job, which included taking care of the infrastructure, participating in data projects, Web publishing, doing the tech purchasing, meeting DOE requirements and filing reports, monitoring tech support for 1200 computers spread across 8 sites, and providing professional development when it fit into all of that, I realize that I will not miss most of it. I will miss the teachers and students who were the reason I did what I did, but now I can concentrate on what I love the best-- helping teachers with strategies, tips, tricks, and information to embed technology meaningfully into their curriculum to best support teaching and learning!
Visit Kathy's Web pages:
Kathy Schrock's Home Page
Kathy Schrock's Guide for Educators
Kathy Schrock
.
Blog
.
<span class='date ' tip=''><i class='icon-time'></i> Aug 05, 2015 06:17am</span>
|
|
CC: www.flickr.com/photos/utnapistim/73429019/
Around this time of year, as the back-to-school sales start showing up online and in stores, I receive emails from parents who are asking my advice about which laptop to purchase for their college freshman. Of course, I have to write back and ask some additional questions about their choice of OS, their planned laptop budget, what major the student is planning to pursue, what else besides schoolwork the student wants to do with the computer, if the laptop is going to be the single machine of the student's, and what school their child will be attending.
The last question is really the most important. I have heard horror stories from college students who purchase a laptop online or in the store of a retailer. Then, at some point during college (usually when they need it the most) the laptop breaks down. The student winds up spending hours on the phone with the laptop manufacturer's tech support or winds up being without the laptop for a few days after they drop it off at the retailer's repair shop.
There are tons of laptops on the market to pick from, but my recommendation is for the student to purchase it through their college's online store. Many colleges have standardized on a Windows-OS laptop brand and the Apple laptops. By purchasing the laptop through the college, the student receives an academic discount as well as the peace of mind to realize their college usually has brand-certified repair personnel either on-staff or on-contract. The student can simply walk into the technology department in their college bookstore and get the help they need. (In addition, at this time of year, there are online purchasing incentives with the purchase of a laptop for college. For example, a Windows-based machine over $699 garners the student a free xBox360 and the purchase of an Apple laptop comes with a $100 gift card to the Mac App store.)
Some things to consider:
A budget for a laptop that will serve a student well will not cost under $1000. Matter of fact, that should be the starting point. Parents should plan to spend $1000-1500 for this new laptop. If a student has a decent desktop, and will only be using the laptop for taking notes in class, then a less-powerful and cheaper one (or even an iPad and external keyboard! will work. Most of the price of a laptop is determined by the processor and its speed, the amount of RAM (4 GB minimum!), the video card RAM (512 or better) and the size and type of the hard drive. (The screen size is part of the cost, but, sometimes, the smaller screens carry a premium price!)
Even if the laptop is also going to be the student's desktop machine, do not go for the massive 16-17" monster machine. It is way too heavy to lug around and will not fit nicely on a college chair-desk. Keep the weight of the laptop to under 5 pounds. A 13 or 14" (maybe even a thin 15") with a decent resolution will be just fine. The price of a large external monitor for the student's desk, if the student feels they need a larger screen at times, will be under $150. (I currently like the Acer S211HL BD 21.5" monitor ($140) because it is really bright and crisp.)
Wait until the student visits the college bookstore to purchase their Office or iWork suite, since the academic pricing in the college store is often the best pricing.)
I also am often asked if the laptop will be able to last through the student's college career. I tell them, with the wear and tear on a laptop that is carried around in a backpack, used everywhere from the cafeteria to the campus bus, it is likely that a second laptop will probably be needed at the beginning of junior year.
Any thoughts to contribute to the conversation?
Visit Kathy's Web pages:
Kathy Schrock's Home Page
Kathy Schrock's Guide for Educators
Kathy Schrock
.
Blog
.
<span class='date ' tip=''><i class='icon-time'></i> Aug 05, 2015 06:17am</span>
|
|
Year 5 of the Leadership Day initiative, spearheaded by Scott McLeod, is being held today. I had not been aware of it in years past.
The instructions are for educational technologists to "blog about whatever you like related to effective school technology leadership: successes, challenges, reflections, needs, wants, resources, ideas, etc. Write a letter to the administrators in your area. Post a top ten list. Make a podcast or a video. Highlight a local success or challenge. Recommend some readings. Do an interview of a successful technology leader."
Some of things suggested to help out administrators are to help them with strategies for determining:
what it means to prepare students for the digital, global world in which we now live
how to recognize, evaluate, and facilitate effective technology usage by students and teachers
what appropriate technology support structures (e.g., budget, staffing, infrastructure, training) look like or how to implement them
how to utilize modern technologies to facilitate communication with internal and external stakeholders
the ways in which learning technologies can improve student learning outcomes
how to utilize technology systems to make their organizations more efficient and effective
I have not participated in this initiative in the past, but I think it is an extremely important event. And, in addition, just the process the for the day is a way to mentor for administrators how to communicate, use their PLN to spread the news and to learn about new initiatives, and use the "power of many" for all types of things.
Patrick's post that led me to this initiative
For instance, I learned about #LeadershipDay11 this morning, via Patrick Larkin (@bhsprincipal) on Twitter. He is an important part of my personal learning network because, as a school principal and very involved in social media and training of other administrators, he brings a new dimension to the type of information I receive. He consistently targets successful practices in technology use in schools but it is through the eyes of an administrator. Patrick is someone I happen to know in real-life, too, but he was a trusted source of information well before I ever met him in person.
Administrators need to hone their personal/professional learning network in this way. Start following Patrick on Twitter, and then take a look at who HE follows. He is an expert in his field, and chances are very good that he follows many other experts that one can learn from.
Result of advanced search in Twitter search tool
Or simply use the Twitter advanced search tool to search by various topics you are interested in and find some people to follow. But, don't forget to "pay it forward"-- become a participant in the process, too. Answer questions posted by others or re-tweet great posts to your followers.
Screenshot of recent #edchat post
Administrators should also pencil in the weekly #edchat session on Twitter or read through the archives to explore new ideas, tips, tricks, and find others to follow.
This same skillset is what we are trying to help students develop as we prepare then for the digital, global workforce and world-- find the experts, participate in the process, and collaborate. With the information explosion, there is no way anyone can know everything. However, knowing where to turn with a question or when trying to keep up with what is going on in a certain field, is a skill that will lead to our students to become lifelong learners!
Kudos to Scott and all the other bloggers who will contribute today!
Visit Kathy's Web pages:
Kathy Schrock's Home Page
Kathy Schrock's Guide for Educators
Kathy Schrock
.
Blog
.
<span class='date ' tip=''><i class='icon-time'></i> Aug 05, 2015 06:17am</span>
|