Blogs
|
So, as I have been on the road a lot this past year, airports, hotels, and coffee shops have become some of my favorite places to get work done. Recently, I have been working on iPad workshops and wanted to record the iPad screen by using the Reflection app for Mac. When the iPad and laptop are on the same wireless network, and you launch Reflection on the laptop, the laptop becomes an AirPlay device for the iPad. On the iPad, you double tap the home button, swipe right, chose the AirPlay icon, pick your laptop from the list, and choose to mirror the iPad screen.The iPad shows up on the computer screen as in the image below, and, through the app, you can record everything you do on the iPad and save it as a movie file for demo and/or training.iPad mirrored to the desktop using ReflectionHowever, when trying to do this same thing in a hotel, an airport, or a coffee shop, I could not get the AirPlay icon to show up on the iPad. I could not get the two devices to see one another. Well, of COURSE I couldn't! Why would you want any other device on a public WiFi network to see your laptop or iPad? The networks are designed to keep your stuff secure (even from yourself!)Since I have a few iPad workshops coming up, I wanted to make sure, if the network I was going to be using prohibited me from seeing another device, I had a solution that would work. I actually wound up with two solutions!FIRST SOLUTION The first was to create an ad-hoc or computer-to-computer network between the Mac desktop/laptop and the iPad. It is easy! Simply go up to the WiFi symbol on the taskbar on the desktop or laptop.Pick "Create Network" and you get the "Create a computer-to-computer" network box. Give it a name, pick either channel 1, 2, or 11, and secure it with a password if you want to. On the iPad, go to Settings:Wi-Fi and pick the ad-hoc network from the list to connect to it.AirPlay choices on the iPadStart up the Reflection app on the desktop/laptop, double tap the home button on the iPad, swipe right, chose the AirPlay icon, pick your desktop/laptop from the list, and choose to mirror the iPad screen and you are in business! You will not be able to use the Internet on the computer when the computer-to-computer network is on, so, when you are done, don't forget to go to the WiFi icon on the desktop and choose to "Disconnect from . This will close your computer-to-computer network.Since the Reflection app is only available for the Mac, there is another alternative for Windows and Mac called AirServer. The documentation states it will work over an ad-hoc network, too, so follow the directions for creating the Mac ad-hoc network above and find out how to create one in Windows 7 here. SECOND SOLUTIONWhile searching for an answer to my question, I also came across a reference on how to create an ad-hoc network using the new CloudFTP device, which also does many other things, too.I remembered that I already owned a Zuni Connect Wireless Travel Router and USB Charger which was intended to create a secure personal network in a WiFi or wired environment. I figured if the CloudFTP device could create an ad-hoc network between two devices, perhaps the Zuni Connect could, too. I simply powered it up, attached the desktop/laptop to the ZuniConnect network, and used that personal network it created to create the ad-hoc network with my laptop/desktop. I was able to connect the iPad via AirPlay on that private network and mirror it to the desktop/laptop. (I am going test this in another environment than my home to make sure it really does work!)So, I have two solutions to utilize if the network I am using will not let my two devices see each other over a computer-to-computer network! Have you come up with some additional solutions?
Visit Kathy's Web pages:
Kathy Schrock's Home Page
Kathy Schrock's Guide for Educators
Kathy Schrock
.
Blog
.
<span class='date ' tip=''><i class='icon-time'></i> Aug 05, 2015 06:13am</span>
|
|
VGA to 30-pin and USB connection 1
One of my problems, when considering presenting from the iPad is the ability to keep it charged and hook it up at the same time to the VGA connection present on most data projectors. Both the sync/charge cable and the VGA dongle for the iPad need to use the same 30-pin connector port on the base of the iPad.
Apple HDMI Dongle
Apple offers the HDMI dongle for the iPad that includes a pass-through for the sync/charge cable. I guess this is for watching multiple movies while the iPad is attached to your television via the HDMI port and being able to keep the device charged for the movies.
I know you can mirror your iPad using an Apple TV attached to your television, and you will soon be able to mirror your desktop the same way.
But, in most classrooms and presentation arenas, the data projector does not have an HDMI port, but has a VGA port. I started looking for a VGA dongle for the iPad that provided both VGA out and also allowed the iPad to be powered at the same time.
After extensive searching, I almost gave up, until I came across these DIY (do-it-yourself) project instructions. However, instead of attempting this myself, I decided to purchase one from the creator of the instruction set. He had already modified several and the reviews were outstanding.Well, I received it today and it works perfectly! I was able to project via VGA and keep the iPad charging!
The idea is simple-- the creator opens up the VGA dongle and solders a USB cable in, so you can charge the iPad via the USB cable and the power brick, as well as attach to a projector via the VGA port on the dongle. The iPad will project and stay charged.
Here are two photos of the completed project from two different angles.
VGA to 30-pin and USB connection2
If you are interested in finding out more, please send me an email and I will give you the contact information for the creator.
Visit Kathy's Web pages:
Kathy Schrock's Home Page
Kathy Schrock's Guide for Educators
Kathy Schrock
.
Blog
.
<span class='date ' tip=''><i class='icon-time'></i> Aug 05, 2015 06:12am</span>
|
|
August 7, 2012To all my educator colleagues:As you all know, I retired in June of 2011 from my school district job as Director of Technology. I retired to spend more time learning new things to support you as you embed technology into teaching and learning in a meaningful way. I now have the time to visit districts and help with their technology-related initiatives, teach online graduate courses for the Wilkes/Discovery Masters program and the instructional technology certificate program at Arcadia University, and host several Webinar series. Also, with this retirement, I have had the time to develop and enhance some online information sources for you.1995 siteSince the time I started Kathy Schrock's Guide for Educators in June of 1995, a lot has changed. Web 2.0, social networking, and social bookmarking have allowed every educator to share their favorite sites with others. The search engines have become much more sophisticated and easier to use. And educators have become much more savvy with both finding and creating materials to use in the classroom. So, it is with mixed emotions that I inform you Kathy Schrock's Guide for Educators is also going to be retired. However, I am not retiring from providing you with great resources and ideas to support teaching and learning! I will still be an active participant in the Discovery Education community with my new blog, Kathy Schrock's Katch of the Month. The URL is http://denblogs.com/schrock and make sure to bookmark, Tweet, Like, Google+, and Pin it! The first post will deal with organizational tools, apps, and resources to help you manage your virtual life. Please visit "Kathy's Schrock's Katch" often, add me to your RSS aggregator, and contribute to the conversation on the blog!Guide to EverythingI have moved all the support information for my conference and workshop presentations over to Kathy Schrock's Guide to Everything, located here, http://schrockguide.net, to help you as you think about the practical and pedagogical uses of technology. The evaluation pages, bulletin board pages, and readability pages have been ported over from Kathy Schrock's Guide for Educators, so you will still have access to some of my most popular information. In addition, Kathy Schrock's Guide to Everything includes tons of resources on current educational topics such as authentic learning, Bloom's Digital Taxonomy, iPads, Twitter, infographics, and many more.I will continue to maintain this personal blog, Kathy Schrock's Kaffeeklatsch, where I post gadget reviews and information as well as my other thoughts. You can also follow me on Twitter at @kathyschrock where I share all kinds of quick tips and ideas. I want to thank all of you for your use of Kathy Schrock's Guide for Educators over the years and all the kind notes you shared with me when you found that perfect resource. I realize it is the place where many of you first started your online journey, back in the days of the "information superhighway", and I know you will remember it fondly!I hope to hear from you via the new sites I am now creating. Feel free to continue to email me at kathy@kathyschrock.net whenever you need help!
Visit Kathy's Web pages:
Kathy Schrock's Home Page
Kathy Schrock's Guide for Educators
Kathy Schrock
.
Blog
.
<span class='date ' tip=''><i class='icon-time'></i> Aug 05, 2015 06:12am</span>
|
|
Those of you that follow this blog know that I have been a long-time fan of the Higher Ground products. Two new ones that have caught my eye lately are the PROTEx iPad protective case and the Profile computer/iPad case.PROTExI saw the PROTEx iPad case demonstrated at ISTE12 with a Higher Ground rep throwing his iPad, safely encased in the PROTEx, to the carpet and watching it bounce! He did it over and over and everything was fine with the iPad. I have not tried it with mine, but the shock absorption capability certainly lives up to my expectations! (It fits both the iPad 2 and the new iPad.)My favorite components of the PROTEx, in addition to knowing my iPad will be safe from harm if I drop it, are the iPad speaker redirect channels and the elastic strap on the back that allows you to securely hold the iPad when standing, presenting, or moving about a classroom. Speaker channel on ProtexThe iPad speaker channel, built into the PROTEx, redirects the sound from the speakers which are on the back of the iPad to come clearly (and loudly) out the front of the iPad! This photo shows the design of the channel when the iPad is not in the PROTEx. You can see the front openings for the speaker sound at the bottom of the photo.Elastic strap on ProtexThe elastic strap on the rear of the PROTEx allows you to easily hold the iPad in either landscape or portrait mode. The elastic is stretchy and secure, and it comfortable on your hand.The PROTEx itself is just a little thicker than the iPad and weighs very little. It fits very securely on the iPad, too. I would recommend the PROTEx for anyone that carries an iPad around, works in windy situations (like the Weather Channel meteorologists and storm chaers!), and students who could feel confident that their iPad would be protected if dropped since the PROTEx protects!ProfileMacBook Air and iPad in ProfileI am always in search of the perfect case for my iPad and 11.6" MacBook Air. These are the two devices I carry around most. The best part about the Profile is that both the 11.6" MacBook Air AND the iPad fit nicely in the case!The laptop pocket zips up and has both memory foam protection and a plushy soft interior. If you were not carrying a tablet, the front pocket could easily hold a spiral notebook or book. The Profile is a vertical case, another feature that I look for in a case. The front flap is magnetic, which makes it super easy to open and close. The inside has two pen holders, a phone pocket, four business card/credit card slots, and a clear ID pocket. There is a small zippered compartment for your power supplies or smaller items. The back of the Profile has a slip pocket for papers or a manila folder. The Profile is solid and keeps it shape nicely due to the padding and construction. I know my devices are protected in this case.If you have any questions, feel free to ask!
Visit Kathy's Web pages:
Kathy Schrock's Home Page
Kathy Schrock's Guide for Educators
Kathy Schrock
.
Blog
.
<span class='date ' tip=''><i class='icon-time'></i> Aug 05, 2015 06:12am</span>
|
|
I have a couple of other items I wanted to review for you...Tego Case for iPad2 and the new iPad The Tego case for iPad is another protective case for the device that schools should put on the consideration list. The iPad is easy to get in to the case and it has extra reinforced corners to avoid damage to the device. Tego site: http://www.yourtego.comThe Tego case is made of a very lightweight material but is thoughtfully designed to bothprotect the iPad and allow easy access to ports, buttons, and speakers. In addition, the material has an anti-bacterial property to keep the germs at bay. In schools, where the iPad gets used by multiple students, this is a great feature to have!The retail price of the Tego case is $38.99.Kingston Wi-DriveThis is a cool little accessory for your mobile devices. I purchased the 32GB version ($89.99) but it also comes in 16GB and 64GB. The Wi-Drive is about the same size and shape as the Apple iPod Touch but it weighs a lot less in your gadget bag!The Wi-Drive attaches to your computer via a USB cable so you can first move files, movies, photos, and music to it. (It also charges via the computer USB port or with the included AC adapter.) You have to dis-attach the Wi-Drive from the computer to use it. Once you turn it on, the Wi-Drive creates an ad-hoc network with the SSID of Wi-Drive. You must then install the Wi-Drive app for iOS or Android onto your mobile devices.Wi-Drive network on iPadOn your mobile devices, simply visit the network settings and join the Wi-Drive network. Up to three devices can view or play the files on the Wi-Drive at one time. They can all access different files and even start the videos at different times. (Imagine loading it up with 32GB of movies for a long trip!) DRM movie playing in iPad browserFor moving DRM movies from iTunes, if you sync your iPad with your computer's iTunes account, you simply drag the movie to the Wi-Drive, and access the movies through the Web browser on the mobile device via the static IP of the Wi-Drive. Purchased items may only be played via the Wi-Drive on mobile devices that have the same Apple ID as the computer's iTunes account. File system and file on the Wi-DriveThe Wi-Drive acts as external storage and is accessible even when you do not have WiFi available. And, for non-DRM items, any three mobile devices can connect to the Wi-Drive and view or play the files. The Wi-Drive is an interesting concept, and I will be spending more time thinking of creative ways to use it!Side note: We have an MicroCell (cell phone service booster) in our house so, on the iPhones, we had to put them in airplane mode and then turn just the WiFi back on in order for them to see the Wi-Drive. No problem with the iPad, since it does not use the MicroCell.Have any gadgets you would like to share? Just post about them in the comments!
Visit Kathy's Web pages:
Kathy Schrock's Home Page
Kathy Schrock's Guide for Educators
Kathy Schrock
.
Blog
.
<span class='date ' tip=''><i class='icon-time'></i> Aug 05, 2015 06:12am</span>
|
|
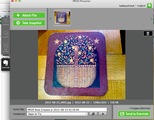
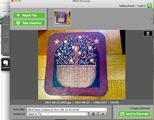
I have been using the IPEVO Point 2 View and the Ziggi USB document cameras for the past couple of years. Their ease of use for projecting 3-D objects, snapping images, and recording videos has made them a staple in many classrooms. The Point 2 View software for the desktop will soon be updated to include sending the captured images directly to Evernote!I have long demoed Evernote to teachers and students. The ability to both upload and access the Evernote notes from all types of devices makes it the perfect curation tool for students. I, myself, have only just begun using Evernote to its full potential and on a regular basis.When IPEVO sent me a beta version of their new software with the Evernote integration, I was very excited to try it. It works like a charm! Here are the images of the process of snapping an image and sending it to Evernote from the IPEVO desktop software.Choosing the IPEVO image and the notebook in Evernote to send it to.IPEVO to Evernote success!The note and image as viewed in EvernoteWith more and more classrooms having IPEVO doc cams and students using Evernote software, the integration of Evernote into the P2V software is sure to be a hit!
Visit Kathy's Web pages:
Kathy Schrock's Home Page
Kathy Schrock's Guide to Everything
Kathy Schrock
.
Blog
.
<span class='date ' tip=''><i class='icon-time'></i> Aug 05, 2015 06:12am</span>
|
|
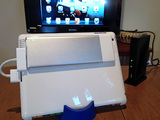
I was sent the Wipad Pro (http://gowipad.com) to demo and it is a cool device! The receiver plugs into an HDMI port on a projector or monitor (or to a VGA connection via a VGA/HDMI converter box accessory offered by Wipad). The snap-on back for the iPad 2 or new iPad with its attached transmitter plugs into an Apple HDMI dongle and the 30-pin port on the iPad. The transmitter recharges via an included USB cable.Wipad Pro: snap-on back, transmitter, and receiverThe iPad is projected in HD and the sound winds up coming out of the TV or projector. You are not tethered to the projection device so you can roam around the room. So what makes this different than simply mirroring with the Apple TV? One big thing that is useful for many schools.With an Apple TV, the iPad and the Apple TV need to be on the same network, whether the Apple TV is being used wired or wirelessly. The Wipad does not use the network to connect and does not impact the network traffic! It uses a wireless technology that does not interfere with any other devices. So, when you are streaming that Discovery Education video from the iPad to the projection device, you are not utilizing the network bandwidth. The IT crews will love this device! And, in addition, there is no lag at all, with video, audio, or apps. I even powered up SlingPlayer, which loads the cable connection at my home to my iPad, projected it via the Wipad, and it was perfect on the TV! (In addition, the Internet connection on your iPad still works, something that does not occur if you have to set up some type of ad-hoc network between your iPad and a computer.)For school use, IT departments will be happy and for those of you that cannot wirelessly project via an AppleTV at school, this is a good solution. For those of you who present in hotels or in rooms with no WiFi, this device can be used to present since you do not need a network. You can roam with up to 100 feet away as long as you have line of sight to the receiver. If your school or organization purchases several Wipads, the receiver can store the identifier of up to eight transmitters. This is helpful if the receivers stay plugged into projectors or televisions in various rooms and the iPads move around.Set-up of projection. Projected image is perfectly clear. The photo is not!There are a couple of things I need to mention. The Wipad does work great. You simply pair the transmitter with the receiver and the projected iPad immediately shows up. You can wirelessly project from up to 100 feet away. The snap-on back did not fully snap-on to my new iPad since I had a skin on the back of my device. If your iPad does not have a skin, there should not be a problem. The transmitter that attaches to the back of the snap-on back does add a little weight (6 oz.) to the iPad, but nothing that would preclude carrying it around the classroom or presentation venue.The price of the Wipad Pro is advertised at $399 on their site. Educators can receive a discount of 25%. There are volume price breaks for the purchase of 50 or more, but things can be negotiated on a case by case basis. You can read more about it, see the specs, and the features on the Wipad site.
Visit Kathy's Web pages:
Kathy Schrock's Home Page
Kathy Schrock's Guide to Everything
Kathy Schrock
.
Blog
.
<span class='date ' tip=''><i class='icon-time'></i> Aug 05, 2015 06:12am</span>
|
|
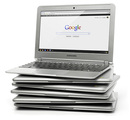
Last week, I purchased the new Samsung Chromebook. I had been hearing lots of good things happening in schools that have Chromebooks, and, as a Google Certified Teacher, I decided to learn more about them.There are two new Chromebooks available right now-- the Samsung for $249 and the Acer C7 for $199. Here are the simple specs on each--Samsung11.6" matte screen2 GB RAM16 GB SSDSamsung Exynos 5 Dual 1.7 GHz processor1 USB 2.0 port, 1 USB 3.0 port, HDMI port, SD card slotBluetooth2.4 lbs.6.5 hours of battery lifeAcer11.6" glossy screen (1366x768)2 GB RAM320 GB SATA hard driveIntel Celeron 1.1 GHz processorEthernet 10/100 port, VGA port, 3 USB ports, HDMI port, SD card slotWireless a/b/g/n3.05 lbs.3.5 hours of battery lifeI waffled back and forth before deciding which machine to buy. Originally I was enticed by the VGA-out on the Acer for presenting and the Ethernet port to hook it up to a network, but the 3.5 hour battery life and extra weight of the Acer made me change my mind. However, I believe, in a school setting, the Acer Chromebook would make a good teacher machine. Since it would probably be plugged in, the teacher could take advantage of the larger hard drive, the Ethernet port, and the VGA-out for presenting and not worry about battery life.I decided on the Samsung and was not disappointed! It is decently speedy and has a great keyboard and trackpad. (One kind of weird thing on the Samsung is the letters on the keys are in lower case!) I went to Best Buy to see the Acer and the Samsung side-by-side, and the glossy screen on the Acer popped and seemed to be more readable. The matte finish and not-so-bright screen on the Samsung took a little getting used to, but it seems to be usable even when the sunlight is shining right on the screen and there are no reflections like those on the glossy screen.Of course, it is not about the hardware but about the move to computing in the cloud. The Chrome OS brought over all my settings from my Chrome browser on my computers, so I had all my "stuff" right away! I then took the time and went through the Chrome Web Store and installed other apps and extensions for things I knew I would need, like an image editor, a Twitter tool, and and FTP client. There are tons of applications and utilities available that can be run right in the browser! The camera on the Chromebook even allows you to record directly into YouTube!There is a cool Remote Desktop plug-in, which allows you to control your home computer (or any remote computer) from the Chromebook. You have to install software on the other computer for it to work, but it works great!With each Chromebook purchased (at least right now) you get upgraded to 100 GB of Google Drive storage. Getting used to using Google Drive for file storage, and not just Google Apps, is a different way of thinking for me. You can save and access files off an SD card in the slot, too, but using online storage is so much easier!When I am not in a wireless environment, I can still work on various Google apps, like Google Docs, using an off-line version of these apps. When I get back into WiFi, the items sync with my Google Drive.I have not yet been able to print. One needs to use Google's Cloud Print to do so, and, although I can see my printers, they are grayed out. I am assuming it is something in my networked printer set-ups and not the Chrome OS itself.With the cost going down on these devices, I am starting to get questions about the benefits of Chromebooks over netbooks and tablets for the classroom. At much the same price point as a netbook, you really get a better experience on a Chromebook, in my opinion. The browser becomes transparent to the user and everything works smoothly. The 10" tablets are appreciably more money than the Chromebook, although some of the 7" tablets are less or just a bit more in price, so, if you are comparing apples and oranges, the smaller tablets and the Chromebooks are similar in price.The battery life of the Samsung is a big plus, too. It can last an entire school day without recharging. Of course, most of the tablets can, too. And there are many apps on a tablet that are not dependent on Internet access, so tablets come out ahead in that respect. But, the "real" keyboard on the Chromebook is seen as a useful thing in some user's eyes.One point that really is evident about the Chromebook is the ability of multiple users to use the same machine without any worries of getting to someone else's data, or special set-ups, or any worries at all! Shared netbooks and tablets do require some finagling at times if there are multiple users. If a school is supporting a 1:1 initiative, then this point does not make a big difference in decison-making. But for the many schools that go with the "cart o' devices" model, the use of a Chromebook takes all the worry and work out of sharing.I love the iPad and do iPad training in schools all over the country. And, when asked, encourage schools to do a 1:1 pilot when starting out with iPads or Android tablets. The experimentation and testing goes easily when each device is only used by one student. (I know there are second party products that make the shared tablets doable, too, but, for schools that do not have the tech support infrastructure, it can be problematic at times.)Is the Chromebook as cool as an iPad? No. The touch interface and the wonderful apps for the iPad that making you "feel as one" with the device cannot be beat. But, for schools considering an alternative, give the Chromebook a try in a pilot project You will definitely be pleasantly surprised!Thoughts? Things you want to share? Leave me a comment!
Visit Kathy's Web pages:
Kathy Schrock's Home Page
Kathy Schrock's Guide to Everything
Kathy Schrock
.
Blog
.
<span class='date ' tip=''><i class='icon-time'></i> Aug 05, 2015 06:10am</span>
|
|
I am a Google Certified Teacher, an Adobe Education Leader, and a DEN STAR and GURU. I earned each of these distinctions by helping others, providing continuing support in the areas of expertise that I have, and I feel like a very valued member of each community. Two of the three require formal reporting of activities and re-application to continue to be a member. The goals of all three are clear and I know what I have to do in order to stay a part of those communities -- support other members of the community and all educators who request help and support.I have been thinking about assessment lately. When we assess students, we always give them feedback. We let them know what they were successful with and things that could have been improved upon. Many times, this feedback goes hand-in-hand with a rubric the student had access to before the assessment.I have applied to be an Apple Distinguished Educator twice and a Sony Education Ambassador once. I feel I have something to offer to both groups and I would also love to learn from the other stellar educators who are part of these communities.I have been turned down all three times. I spent a lot of time studying what each community was all about and worked hard on the applications and products that had to be created. I didn't make the cut because there were others who did a better job than I did and/or were more qualified. That's fine and that's the way it should be. But how am I going to learn to grow to better meet the needs of what the communities expect without any feedback? I assume there were rubrics for judging and that there were educators who were members of the community who were judges. What about giving all the applicants their summary scoring sheet including how they were scored? I encourage all organizations who are creating educator support groups to include the scoring rubric being used in addition to the overview of the program and the expectations for becoming a member before the applications are submitted. And then provide both the winners and losers with a detailed score. I want to become a better educator. Share your organization's vision of what that looks and feels like with me, please, so I can continue to grow!No sour grapes...really!
Visit Kathy's Web pages:
Kathy Schrock's Home Page
Kathy Schrock's Guide to Everything
Kathy Schrock
.
Blog
.
<span class='date ' tip=''><i class='icon-time'></i> Aug 05, 2015 06:10am</span>
|
|
Educators are busy re-mapping and re-working curriculum at all levels to align with the Common Core State Standards (CCSS). As I began to take a look at this monumental initiative, I decided a way I might help was to identify the rubrics that have been developed thus far for assessment of these standards. Some states started earlier than others with this project and I am sure additional resources will be showing up on the Web soon! Here are the rubric links that I have located thus far: K-6 Rubrics for writing standards 1, 2 & 3 Text-based writing rubrics K-12 Smarter Balanced ELA rubrics K-12Checklist for critical areas in K-2 mathCommon Core Rubric Creation ToolCommon Core Checklists K-6Math Exemplars (Detailed)PARCC Analytic and Narrative Writing (Gr.3)PARCC Analytic and Narrative Writing (Gr.4-5)PARCC Analytic and Narrative Writing (Gr.6-11)Rubrics for Evaluating OER ResourcesWriting: Content Rubric, one passage (Gr.3) Writing: Content Rubric, two passages (Gr.3) Writing: Content Rubric, one passage (Gr.4-8) Writing: Content Rubric, two passages (Gr.4-8) Writing: Style Rubric (Gr. 3-8)Writing: High School Style Rubric 1 & 2I also found two rubrics for reviewing lessons and units for the CCSS:Engage NY ELA Evaluation Rubric Engage NY Math Evaluation Rubric As I find additional ones, I will be adding them to my Assessment and Rubrics page. Have you come across any other useful tools to support the CCSS? Has your district created a series of rubrics in ELA or Math? Share the URL with us in the comments!
Visit Kathy's Web pages:
Kathy Schrock's Home Page
Kathy Schrock's Guide to Everything
Kathy Schrock
.
Blog
.
<span class='date ' tip=''><i class='icon-time'></i> Aug 05, 2015 06:09am</span>
|