Blogs
|
Learning Resources recently sent me their new now!Board, a tiny, portable, interactive whiteboard tool, to review. What a neat device! It turns any surface into an interactive whiteboard and all you need is a computer and a projector!
now!board package contents
Those of you who follow me know that I love cases, and the main components fit nicely in the included 10" x 7" x 2" case.
To set-up the now!Board, I simply installed the software on my laptop, hooked up a projector, hooked the now!Board camera via USB to my computer, and placed it about 12 inches behind the projector, pointing at the surface I was projecting on.
I launched the software, adjusted the angle of the camera, and started to calibrate the now!Board on the wall in my house. It was hard to find a blank wall in my house and the projected image was extremely keystoned which made it difficult to calibrate all the points. I decided to find a dry erase board at the right level and try again.
The now!board wand, camera, and stylus
Once the projector, image, and now!board camera were pretty much level with each other, the calibration was a snap! I used the handheld stylus on the right for calibrating. This was also the stylus I used for the movie below. This stylus is intended for use with a dry-erase board or regular whiteboard. It has the ability to right-click, too. The 24" wand (on the left in the photo) is for using with surfaces the handheld stylus might scratch up or for younger students so they can reach the projected tools and images.
The tool set in the software offered all the necessary IWB tools including screen capture, scaling, an on-screen keyboard, blank whiteboard desktop, and more.
I did a short Jing screencast of my computer screen as I used the now!Board software tools via the handheld stylus on the dry-erase board.
The now!Board would come in very handy for sharing among classrooms and rolling computer carts, since nothing has to be mounted on the wall or classroom board to hold it, any surface can be used to project on, and it is very easy to set-up and calibrate once everything is close to being on the same level.
Teachers have asked me if the now!Board can be used with an iPad in the mix. I decided to test out some options. I first hooked the projector and the now!Board camera to the computer and launched the now!Board software. I wirelessly streamed the computer screen to the iPad screen via Splashtop Remote and Splashtop Streamer. I could not use the tools effectively, though, using the iPad as the "stylus". I could definitely use the arrow and control file menus and such and pick any tool on the tool menu. But I had a hard time highlighting and drawing. I was envisioning that someone could be at the projected image using the now!Board stylus and someone else could be remotely using an iPad, but that did not pan out as a viable option. It was only a trial run to see what would happen and who knows what will be available for the iPad in the future to make it work!
Here is a brief hardware set-up video, produced by the company, to give you a better feel for the hardware set-up process. A series of tutorial videos come on the software CD.
And here is the short (2:35) product video, created by now!Board.
The now!Board portable interactive whiteboard device will start shipping in April of 2012. You can find out more about it and order it for $499 at the Learning Resources site now. You can also follow them on Facebook to keep up-to-date!
Update May 21, 2012:
Last last week I received the new wand for use on surfaces that the hand-held stylus might scratch up. It worked perfectly for calibrating, marking up a projected page and using the menus and on-screen keyboard in the now!Board software on the Mac. Below is a quick photo of my set-up and a screenshot taken from the software.
now!Board and stylus and wand set-up
Screenshot from within the now!Board software of the projected image
Visit Kathy's Web pages:
Kathy Schrock's Home Page
Kathy Schrock's Guide for Educators
Kathy Schrock
.
Blog
.
<span class='date ' tip=''><i class='icon-time'></i> Aug 05, 2015 06:14am</span>
|
|
I received a review copy of PhatPad for iPad a while back, and have spent some time showcasing it at conferences and in small group sessions.
The PhatWare Web site states: "PhatPad turns your iPad into an advanced brainstorming tool. Draw, write, and type your ideas then instantly share them via email, WiFi sync, Dropbox, or presentation mode. PhatPad’s digital ink technology and handwriting recognition engine allows you to scribble handwritten notes and drawings and convert them into digital text, or perfect geometrical shapes." You can also export the document out to a printer, to Google Docs and to Evernote!
PhatPad 2.0 came out earlier this week ($4.99 in the iTunes App Store), and it is optimized for iOS 5 as well as including handwriting recognition for English, German, French, Dutch, Italian, Portuguese, and Spanish. (There is also an Android version of PhatPad, but it only recognizes English at this time.)
Rather than give you an overview of what it can do, please view the video below to find out its main capabilities, which, by the way, are awesome! Following the video I will share some discoveries and thoughts I have for the use of PhatPad for the iPad in the classroom.
DEFINITIONS
So, now that you know the basics of what PhatPad can do, let me share some of my discoveries! First, once you convert a word to text, you can tap and hold the word and show the definition of the word. This is one way for students to verify that the handwriting-to-text conversion produced the correct word!
INCLUDED CLIPART
In addition, as you saw in the video, you can insert your own image from your Photo Library or take a new picture with the iPad's camera, but PhatPad comes with a TON of clipart, too! There are 28 categories including computers, communications, construction, database, education, emotions, food, fun and toys, medical, music and instruments, networking, transportation, and more! The clipart can save a lot of time with student projects, since they do not have to go out on the Web for images, check the Creative Commons licensing, get it into the Photo Library on the iPad, and then add it to the document. They can simply look through the included clipart and pick something appropriate!
INFOGRAPHIC CREATION
As I was playing around with the clipart, I realized that PhatPad can be used as a layer-based image creation, tool, too! That means the clipart, text, and images can be "piled" on top of one another. I started making a rudimentary infographic, and realized that PhatPad could be used for this purpose, even if just to create the first draft of an infographic a student is creating as an assessment. (More details about using the infographic as an assessment may be found here.)
OTHER FEATURES
There are additional features that would be useful in a classroom setting, too. First, there is the ability to create multiple pages and use a presentation mode to move through the pages. In addition, a student can create voice notes to go along with the pages and even create an automatically-running presentation with the voices notes by setting up the slide timings. You can read about all of the features in the PhatPad for iPad 1.5 User Guide
LAST THOUGHTS
After spending time reading the manual and experimenting with PhatPad for iPad, I am amazed at the number of features it contains! Creative teachers and students could come up with many ways to use this software to support teaching and learning. Are you already an educator or student using PhatPad? If so, please leave a comment and share the ways you use it personally and professionally.
Visit Kathy's Web pages:
Kathy Schrock's Home Page
Kathy Schrock's Guide for Educators
Kathy Schrock
.
Blog
.
<span class='date ' tip=''><i class='icon-time'></i> Aug 05, 2015 06:14am</span>
|
|
I was lucky enough to score early-adopter status for the new Google+ Hangouts on Air and just gave it a try! (Here are the directions for joining a Hangouts on Air session.)
When hosting a Hangout on Air, the first step is to make sure your log-in to YouTube is the same as your log-in to Google+. Once the Hangout on Air is over, a private recording is sent up to your YouTube account automatically. It took about 15 minutes for the 13 minute Hangout to process and show up on YouTube. Once it is up in YouTube, you can make it public or give access to specific users, change the licensing, set up moderation privileges, and so on. The Hangout recording as showcased on YouTube is embedded below.
I posted the info about the Hangout on Air to both my Twitter feed and within Google+. It was early (8:30am ET), so it took a bit for someone to join.
Screenshot from video of a Google+ stream
I only had one participant join the actual hangout, but others were viewing it in their Google+ stream. (I received comments and questions from them later in my Google+ stream.) I could not see that, since I was the host, but my participant screenshared what that looked like. Here is a screencapture of his Google+ stream.
The set-up of the Hangout on Air was simple, the resolution of the screensharing was AWESOME, and those that were able to watch the broadcast live had good things to say. I was a little disappointed that the chat area within the Hangout and the chat among the Hangout participants does not show up in video, but you could overcome that with a screenshare of a tool such as corkboard.me or Wallwisher if you wanted to capture the "chatter" and gather feedback.
If you have any other great ideas for the use of this tool, add a comment! I am thinking that I could easily stream my presentations from conferences if I wanted to. It would be a virtual presentation and a permanent recording all in one!
Visit Kathy's Web pages:
Kathy Schrock's Home Page
Kathy Schrock's Guide for Educators
Kathy Schrock
.
Blog
.
<span class='date ' tip=''><i class='icon-time'></i> Aug 05, 2015 06:14am</span>
|
|
In addition to presenting webinars and traveling to conferences all over the place, I have decided to start a new side business. It is a face-to-face business which you probably would not expect from me!
Right after the holidays, I helped plan and help out at a "Bring your new gadget to the library" night hosted by my town library. We were hoping to get people to bring in their new tablets, e-readers, and digital cameras and to help out with their questions. Over 40 people showed up, which, for our small town, is a big turn-out! The age of the attendees ranged from 50-85.
The questions ran the gamut from "How do I get my Yahoo contacts onto my iPad?" to "Can you help me install what I need on my Pandigital tablet so I can use the e-books offered by the library?" Much of the time was spent with helping Kindle, Nook, and iPad owners with the process for getting the Overdrive e-books onto their devices. Along the way, there were tons of other questions, too!
I realized there really is not a place where our community members can go to learn the basics of the use of all these new tech devices. It seemed like a niche that was waiting to be filled! I was in the process of getting an office in town, anyhow, so I decided to start a business to support those that need help. I have been open for two days now.
The site, which explains the business in more detail, can be found here: http://kackl.net/gadgets.html
I will let you know how I make out! And, if I need any help, I will be sure to tweet out my questions to my very smart PLN! :-)
Visit Kathy's Web pages:
Kathy Schrock's Home Page
Kathy Schrock's Guide for Educators
Kathy Schrock
.
Blog
.
<span class='date ' tip=''><i class='icon-time'></i> Aug 05, 2015 06:14am</span>
|
|
Reflector is a useful application that allows you to mirror your iPad 2 and newer or the iPhone 4s or the iPad Mini, to your desktop using AirPlay mirroring on either a Mac or a Windows machine. The application is installed on your desktop or laptop. The positive implications for the education field are huge!!!
First, as one that often creates screencasts to help people learn a process, the ability to mirror my iPad screen onto my desktop, and then use Camtasia, Jing, or Captivate to capture the process is huge for me! No more mirroring the iPad onto the TV set using AppleTV and using a video camera to record the process!
Here is a quick, no audio screencast I recently made using Reflector and a screencasting tool. It is a quick overview of where the port settings are found in the email settings on the iPad. (Not quite sure about the resolution settings yet, but you get the idea.)
The more important bonus for the classroom setting is that the Mac computer (running Mac 10.6.8 or Windows XP or better) can be hooked up to the LCD projector or whiteboard projector the typical way (usually VGA or DVI). Using the Reflector app, the iPad can wirelessly project onto the computer screen and hence it is shown on the big screen! (Now works on Windows, too!)
The work is all done on the iPad-- the desktop is just the "screen". The iPad can be handed around to students for demonstration of how to use an app, showcasing an online process, or much more! It even sends the audio from the iPad to the Mac, which then, of course, pumps the sound out via more powerful speakers than the iPad has!
For those of you that do not know how to find the AirPlay setting on your iOS device, you simply click on the home button twice, and swipe right once for the iPad and twice for the iPhone. For Reflector, you pick your computer and then turn mirroring on, as shown.
The AirPlay settings on the iPad
All the iOS devices you want to hook to Reflector via AirPlay have to be on the same WiFi network. I just tried the iPad and the iPhone 4s at the same time and they BOTH showed up on the computer screen as you see here:
Desktop with Reflector App using the iPad and the iPhone at the same time
I am not sure how many devices you can hook up at one time, but it seems, if you had a classroom set of iPads, each student could showcase his or her iPad when appropriate while not being tethered to the projector. And you could screencast those presentations on the desktop for assessment purposes, too!
The price of the Reflector Mac App is $14.99 for use on one machine, $49.99 for a 5-pack, and, if you are interested in purchasing more than 20 copies, drop them an email at support@reflectorapp.com and they will work with you!
Update: The Reflector App now does screencasting beautifully! It brings in system audio from the iPad and records that, too. It does not record the iPad "frame". Just the screen area.
Update 2 (5/6/12): Another app has hit the market that also allows turns the computer into an AirPlay device to allow wireless streaming from the iPad or iPhone or iPod Touch. This application is call AirServer and it has different features. It can show up full-screen on the computer screen AND it works with both Windows and Macs. It is $14.99 for 5 licenses. It, however, does not do screencasting at this point.
Update (6/13/12): The Reflector app is now available for Windows!
Update (12/8/12): The app is now called Reflector instead of Reflections. I have changed the name and URL link in this blog.
If you have any more ideas for use of this app in the classroom, add a comment!
Visit Kathy's Web pages:
Kathy Schrock's Home Page
Kathy Schrock's Guide for Educators
Kathy Schrock
.
Blog
.
<span class='date ' tip=''><i class='icon-time'></i> Aug 05, 2015 06:14am</span>
|
|
Thanks to dieselbug2007 on Flickr for this shot. This is how I felt today!
http://www.flickr.com/photos/dieselbug2007/369649914/
I do not often get frustrated with technology. I love learning new things and figuring out the way things work. However, today I set a task list for myself which included creating 40+ screencasts of the iPad as it appeared on the laptop screen via the Reflection app.
I turned to Jing Pro to do that type of thing, since it never has failed to deliver. I set the screen capture area, used the iPad to showcase the application I want to screencast, saved the result to my computer, and plunked it into Keynote. However, since Jing Pro (http://www.techsmith.com/jing-pro-retires.html) is going away and with it the option to save locally (you will still be able to save Jings to screencast.com), I thought I should probably try another option to get more comfortable with it.
I also needed to bring in some system sound with some of the apps I was screen casting (which Jing does not do). I knew I had successfully screen captured video and system audio with Camtasia, so I started there. (I was using my 13.3" Macbook Air.)
Camtasia allowed me to re-size the screen, but it did not capture the video, just the audio. I then tried the new SnagIt to see if it recorded system audio, but it kept crashing on the Macbook Air.
I asked for help from my Twitter PLN and @ShellyMowinkel let me know that QuickTime Pro on the Mac now had a screen recording component. It worked like a charm for video, but, alas, could not capture system audio. However, it is the perfect replacement for Jing! Thanks so much to Shelly and @timholt2007 who suggested I try it.
I decided to download the ScreenFlow app, since there were lots of comparisons to Camtasia in reviews on the Web. It worked well and captured the video and audio, but it only captured a full screen-- not an area. I understand the rationale behind that choice, and the editing of the capture is easy in their tool, but it does add another step to the process.
I tried iShowU HD on the MBA, and I could record, but any format I picked as the output format was not recognized by QuickTime for play back. And the update to the app would not go through.
On the iMac
Since I was having no luck, I was thinking perhaps it was the laptop and not the software.
I sat down at the iMac at home and Camtasia flawlessly recorded the video and audio. Yippee! And, after some research, I found out that an update to v.1.2.2 (which I had not done on the MBA but had done on the desktop) made it work on the Air, too. It seems to be a Lion thing, not a MBA thing!
The new SnagIt did not crash on the iMac, but I discovered it did not do system audio anyhow.
As far as iShowU HD, I finally got a message that the updater for my version was broken, and it allowed me to download the new version and install the update. It captured video and system audio in H.264 format! Now I have a second app to use! I went back and also installed the update on the Macbook Air and it successfully recorded the video and the system audio there as well.
The QuickTime Screen Recorder works well on both devices, but does not record system audio.
I also tried Adobe Captivate 5.5, and it creates a great-looking screencast but no system audio recording, either.
And, although people tell me ScreenFlow works well, I don't really want to spend $90 (with the educator's discount) on a purchase.
With Camtasia and iShowU HD now both capturing video and system audio on my desktop and Macbook Air, I think I am set!
Recap
Remember my goal was to capture video and system audio from an iPad being AirPlayed to a Mac screen via the Reflection Mac app.
Here is the result of my testing today. I am not saying it is definitive, since there any number of things that might be different on your machine -- version of OS, version of software, etc.
Result of testing for screen capture with system audio
If you have any other information that corrects me, please add a comment!
Follow up 1:
Here is a link to the recording of the Reflection app inside a screenshare inside an Adobe Connect Pro meeting.
Everything seemed to work well, as per the recording. I could hear the audio, but the "audience" could not.
http://eduadvisory.adobeconnect.com/p7yfocsho42/
Follow up 2:
Another software suggestion was Snapz Pro for the Mac, and it worked great on the iMac and the MBA while recording system sound and video (although there is a huge watermark in the trial version!). You can chose the recording stage size, so this is another piece of software to consider. (Thanks @bhudd and @MusicEdTech!)
Follow up 3:
The Reflection app has just released an update that will screencast their iPad projection on the computer! And it also captures the audio and works like a charm. It does not capture the iPad "frame" just the moving items and sound on the iPad screen. (http://reflectionapp.com/http://reflectionapp.com/)
Visit Kathy's Web pages:
Kathy Schrock's Home Page
Kathy Schrock's Guide for Educators
Kathy Schrock
.
Blog
.
<span class='date ' tip=''><i class='icon-time'></i> Aug 05, 2015 06:14am</span>
|
|
Derek Gillette, a Marketing Coordinator at BoxWave, sent along two new tech items for my review. Thanks, Derek!
BoxWave Nero Leather Smart Nuovo iPad Case
The first is the Nero Leather Smart Nuovo iPad Case, created for the 3rd generation iPad. (I see there is also a red version, which I am craving, and a cool white one to match those of you that have the white iPad!) This leather case is available for $39.99, with free shipping, on their site right now. The regular price is $59.95.
This case was definitely created for the newest iPad. I have a couple of other tight-fitting, snap-on cases that were made for the iPad 2, and the new iPad does not snap in perfectly to those cases since it is a tad thicker. The new iPad snaps firmly into the Smart Nuovo case's back. I also have a skin on the back of my iPad and it still fit in tightly and firmly.
Inside of BoxWave's Smart Nuovo iPad Case
Smart Nuovo iPad Case with closure and cutouts
The case has all the cutouts needed for the sync cable, headphone jack, microphone, camera, access to the top and side buttons, and has a nice grill across the speaker area which keeps that area safe from scratches.
The Smart Nuovo case is called "smart" since the cover is a smart cover that turns the iPad's display off when it is closed and turns the display on when you open it. I use one of Apple's Smart Covers, but, with this case, there is no need to! This case truly protects the front and back of the iPad while adding very little size and "heftiness" to the iPad.
Smart Nuovo iPad Case in "stand" mode
The Smart Nuovo iPad Case closes with a leather flap, and the same leather flap is used when you fold back the cover and use the case as a stand. (I am not a big stand user, since I hate getting the inside lining that protects the screen dirty by propping it on a table.) However, for those of you that are not worried about that, the stand puts the iPad at the correct angle for viewing and typing on an external keyboard.
BoxWave Universal EverTouch Capacitive Stylus
Woven fiber tip
The second item Derek sent along was the Universal EverTouch Capacitive Stylus. As one who owns various styli, I was interested to see that the stylus tip of the EverTouch stylus was made of a woven fiber rather than the other types of rubber or felt-like tips on the styli I already owned. The cost online right now is $12.95, with volume purchasing available. The regular cost is $24.95. It comes in orange, blue, black, red, and silver. The Evertouch Stylus body is aluminum and very light.
It also comes with three different types of lanyards. There is a lanyard to attach it to your keychain or neck lanyard, there is a lanyard that allows you to plug it into the headphone jack on your device so you always know where it is, and the unique lanyard was one with the same headphone jack but it had a coil that allowed you to use it while it was plugged into the headphone jack.
The third lanyard was the most handy and gives you the least chance of losing the lanyard. It worked best while holding the iPad in landscape mode.
Addendum: I got so caught up in the cool tip and lanyard I forgot to mention the stylus' performance! It worked easily and without fail for selecting, drawing, typing, and writing.
If you or your school is interested in educational/volume licensing, drop Derek Gillette a line!
Visit Kathy's Web pages:
Kathy Schrock's Home Page
Kathy Schrock's Guide for Educators
Kathy Schrock
.
Blog
.
<span class='date ' tip=''><i class='icon-time'></i> Aug 05, 2015 06:13am</span>
|
|
Today I created a video with the very fun app for the iPad (and iPhone and iPod Touch) called SockPuppets. I had a special reason for using it and purchased extra time to make my video longer than the 30 seconds that they allow.
The output options in SockPuppets are to share to Facebook or YouTube. I needed to get the video up to YouTube, so I thought I was all set. However, I got an error message whenever I tried to send the video to YouTube. I figured I could solve it with a little research.
I did some searching, and could not come up with any posts of others having troubles.
I then went to the app creator's Web site and looked in the Knowledge Base and FAQ's.Nothing there.
I did a chat session with tech support at the company's site, and was told I probably needed to set a setting in YouTube that would allow uploads from third party apps.
I looked through YouTube and found no such setting.
I then put in a request to the YouTube team for help.
I posted my first note to Twitter asking someone to try to do the same thing so I could see if it was just me. Of course, I am retired, and everyone else was actually teaching, so I did not get any responses.
I tried it on the iPhone with the same resulting error message.
I decided to share the video it to Facebook, which worked well, and then used the new version 2.1 of Camtasia for the Mac to record the video from Facebook. I then moved the resulting screencast to YouTube.
I posted another tweet asking for help and got lots of responses. Some of my PLN members even took the time to download the app, create a video, and try the upload. Below are the responses I received. The results were mixed, and I could still not figure out the problem.
Twitter answers to my ask for help
Jen Legatt (@192TIS) was a new user of SockPuppets, so, when she told me it worked for her, I asked if she used a Gmail address when the app asked for log in information to YouTube. You can see from the above conversation that she told me she had used only her USERNAME, not the full Gmail address. Doh!
I went back and looked at the sign-in screen in SockPuppets and it did just say enter your YouTube username and password, not your Gmail address and password. Geesh! Once I put in only my username for YouTube, not the entire Gmail address, it worked like a charm!
I spent most of the day figuring out how to make this work and searching and asking. And it was one little follow-up question to one of the great educators that were helping me out that provided the answer! I love my Twitter PLN!
Visit Kathy's Web pages:
Kathy Schrock's Home Page
Kathy Schrock's Guide for Educators
Kathy Schrock
.
Blog
.
<span class='date ' tip=''><i class='icon-time'></i> Aug 05, 2015 06:13am</span>
|
|
Yesterday on Twitter, Dr. James Norwood (@JRNorwood) posted a short tweet entitled "Flipping Bloom's Taxonomy". The intriguing title led me to click to the link that led to his Teaching in the Middle blog post about a blog post he had read on Shelley Wright's blog, Powerful Learning Practice.
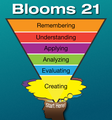
The gist of the blog post was Shelley's idea to start with the creating cognitive process and "flip" the pyramid so it looks something like the image below.. She states, "Here’s what I propose. In the 21st century, we flip
Bloom’s taxonomy. Rather than starting with knowledge, we start with
creating, and eventually discern the knowledge that we need from it."
http://plpnetwork.com/wp-content/uploads/2012/05/bloom_pyramid-2.png
I do not think I agree. I do promote the use of problem, project, inquiry, and/or challenge based learning models to allow students to take control of their learning. However, I truly believe students need to have at least some knowledge-base in a topic before they can analyze, evaluate, or create something with the content at hand. In addition, during the acquisition and creation of new knowledge, learners move up and down the cognitive levels as they need to.
Shelley states that she (and many others) were taught that "Blooms becomes a "step pyramid" that one must arduously try to climb with your learners." I am glad my professors at Rutgers College of Education did not teach it this way! I am a big fan of the pedagogical model and thinking about the different levels has always allowed me to plan activities at any (or all) of the levels at any point in the teaching and learning process. I never thought of Bloom's Taxonomy as a series of steps to the top.
However, I do agree with Shelly that the pyramid shape, with the little tip left for creating, may confuse some educators into thinking only some students are capable of getting to that level or creativity is a small component of the cognitive skills process.
I gave it some thought, and developed a different graphic to represent the taxonomy based on how I utilize it. Take a look at the image below and let me know what you think!
References:
Norwood, James. 17 May 2012. "Flipping Bloom's Taxonomy". Blog post. Teaching in the Middle,
Wright, Shelley. 15 May 2012. "Flipping Bloom's Taxonomy". Blog post. Powerful Learning Practice.
Visit Kathy's Web pages:
Kathy Schrock's Home Page
Kathy Schrock's Guide for Educators
Kathy Schrock
.
Blog
.
<span class='date ' tip=''><i class='icon-time'></i> Aug 05, 2015 06:13am</span>
|
|
I decided to combine two short iPad app reviews in one blog post.
FreeSpeech
The first review is the release of my son's no-cost (and no ads!) AAC app, FreeSpeech, which was created to support those with communication disorders. The goal was to provide an app that would be easy to use, scalable, and encompass new features. The team has been developing the app for over a year and formed a non-profit, GiveSpeech, to help keep the app free. They are working hard on enhancements all of the time!
The app includes a series of symbol libraries upon download, and the ability for the user to add their own icons. However, the coolest features are the community and collaboration aspects. Users can upload and share icons they create or photograph and also download those from others from within the application iteself. This allows for an never-ending shared library of all kinds of new icons! I just visited the community area and downloaded a set of photos called "Trip to the Farm" uploaded by another user. I can see the community growing and perhaps including a discussion board to include requests for images needed and users volunteering to create those icons for others.
I used the Reflection app to create a short video to showcase FreeSpeech. This is only a brief overview of how it works. (The voice sounds a lot clearer in real life than it does in the video, promise!)
Download FreeSpeech for yourself and try it out! There are also instructional videos located here, but FreeSpeech is so easy you probably won't need them!
Take
some photos in your area of things that others might not have in their
region or town and take the time to upload them to the FreeSpeech
community area. I am going to add some regional Cape Cod items like
lighthouses, windmills, and cranberry bog to the community soon.
Draw on Slides
In the video above, I took a screenshot of the last screen of FreeSpeech and added an image to my photo library. I then used an app called Draw on Slides to mark it up. You can see that there are different colors and thicknesses of lines to chose from as well as the ability to place an arrow on the line if you wish. This marked up image can be saved as a new image to the Photo Library, sent to Facebook, or emailed. Draw on Slides is a useful app to mark something up in front of students or share an instructional image with others.
Visit Kathy's Web pages:
Kathy Schrock's Home Page
Kathy Schrock's Guide for Educators
Kathy Schrock
.
Blog
.
<span class='date ' tip=''><i class='icon-time'></i> Aug 05, 2015 06:13am</span>
|